Overview
ARitize 3D's QuickAR enables online retailers to offer Augmented Reality (AR) and 3D product views to shoppers with minimal technical and operational investment. In order to add the ARitize 3D tag into the Shopify installation, we will need to modify the current theme that you are using. The structure and name of the theme files may vary from theme to theme, so you may need to find the appropriate one that you are using. The structure and name of the theme files may vary from theme to theme, so you may need to find the appropriate one that you are using.
Tag Details
Access to modify the Shopify theme is required to add the AR and/or 3D buttons onto the product pages.
By following these instructions, the following buttons will be added to your product page:
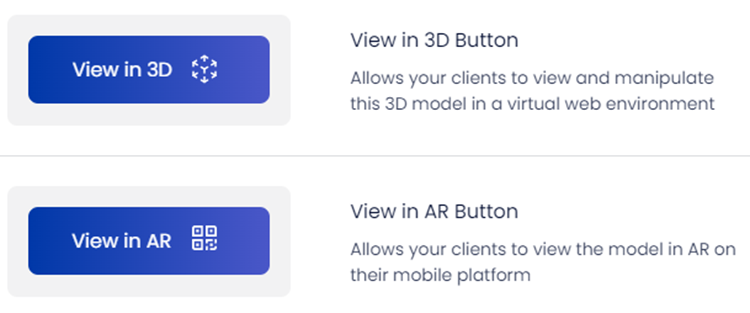
Code for ARitize Buttons
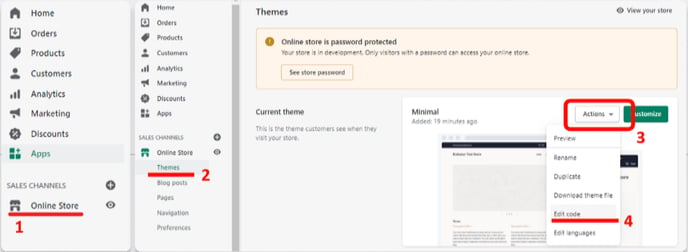
Step 1:
Go to your Shopify Theme Code Editor.
- Click Online Store in the left menu.
- Click Themes in the fly-out menu beneath Online Store.
- Click the Actions drop-down menu.
- And then click the Edit code button.
Step 2:
- Click the Snippets folder in the files list to the left of the code.
- Click Add a new snippet link at the top of the list.
- Enter aritize-3d-quick-ar.liquid as the title of the new snippet and click Create snippet.
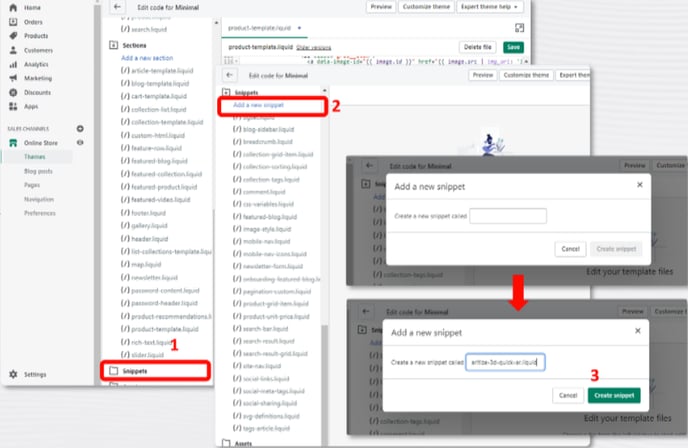
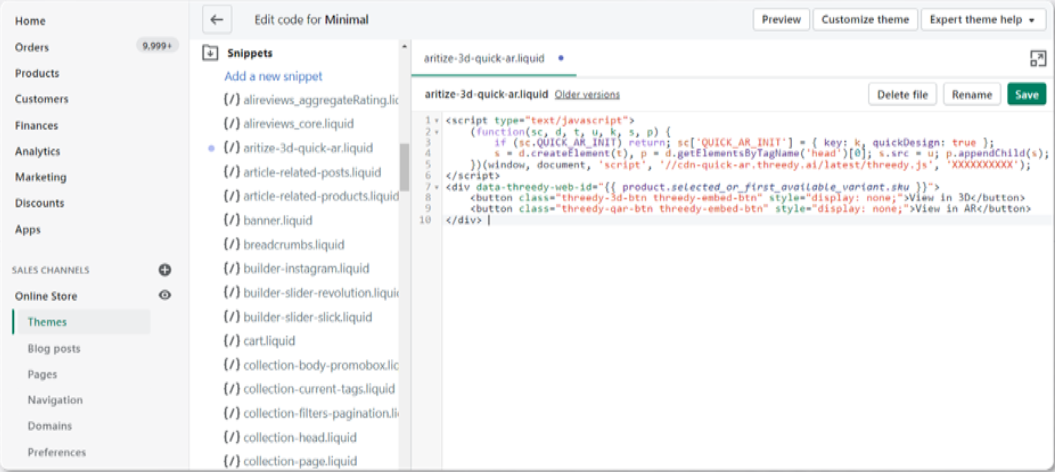
4. Paste the code below into the aritize-3d-quick-ar.liquid file that was created.
5. Click Save when you are done.
Insertion Process
The process of inserting the JavaScript tag is easy.
- Find your personalized code and client key by following this guide.
- Follow the guide above if you would like to include buttons for ARitize Configurator and ARitize Decorator. If you are interested in learning more, please contact us.
- Paste the code below into your tag management system where you want the buttons to appear on your website.
Code to Paste:
<script type="text/javascript">
 (function(sc, d, t, u, k, s, p) {
 if (sc.QUICK_AR_INIT) return; sc['QUICK_AR_INIT'] = { key: k };
 s = d.createElement(t), p = d.getElementsByTagName('head')[0]; s.src = u; p.appendChild(s);
 })(window, document, 'script', '//cdn-quick-ar.threedy.ai/latest/threedy.js',
'REPLACE_WITH_CLIENT_KEY');
</script>
<div data-threedy-web-id="{{ product.selected_or_first_available_variant.sku }}" data-threedy-sku="default">
<button class="threedy-3d-btn threedy-embed-btn" style="display: none;">View in 3D</button>
<button class="threedy-qar-btn threedy-embed-btn" style="display: none;">View in AR</button>
</div>
Note: Replace the value REPLACE_WITH_CLIENT_KEY in the code above with the client key provided by ARitize 3D.
The line data-threedy-sku="default" can be excluded if the Option ID in the client portal is set to default. For example, if the Option ID for all your products in the client portal are all default, then it can be excluded. For the value of data-threedy-sku replace default with the value of the Option ID in the client portal (https://portal.threedy.ai/).
Each button is independent of the other, so you can choose to insert both or just one of the buttons.
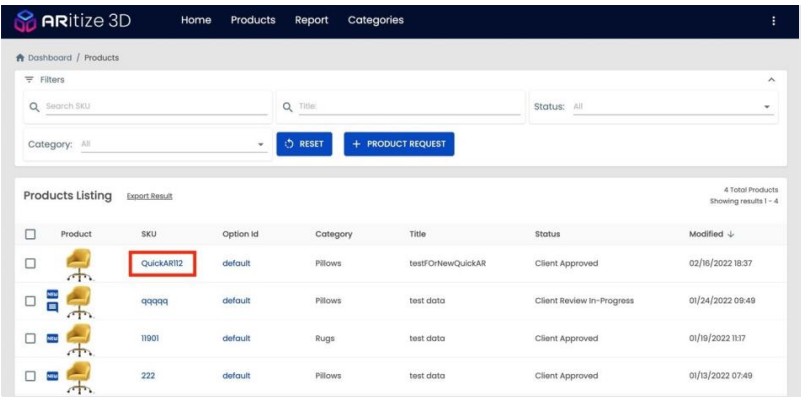
You can find these values by selecting Products in the top navigation which then shows the listing of the products. The columns for SKU and Option ID are used by the data attributes data-threedy-web-id and data-threedy-sku.
For the CSS class 'threedy-embed-btn' it is only needed if you want to match the default ARitize styling (the blue buttons with the icons), otherwise you can remove it and add your own CSS. The other CSS classes and styles are required.
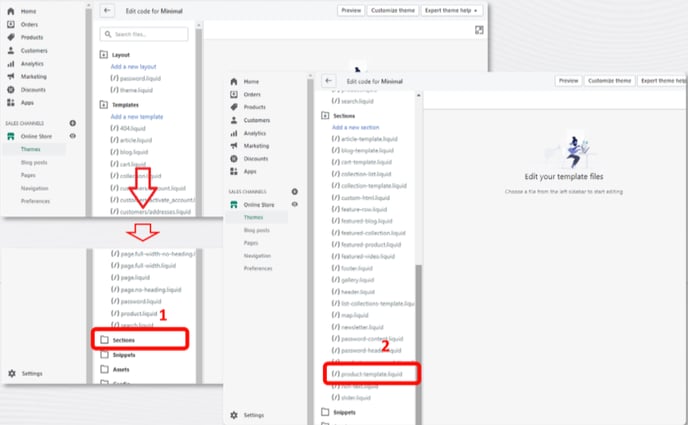
Step 3:
Paste the Render Code below anywhere in the product-template.liquid file.
- Scroll down in the list of files until you see Sections, click to open it.
- Scroll down until to see product-template.liquid and then click it.
- If you are unable to find that file, please note that Shopify themes can have different file names, the file used for the product template may be called something else.
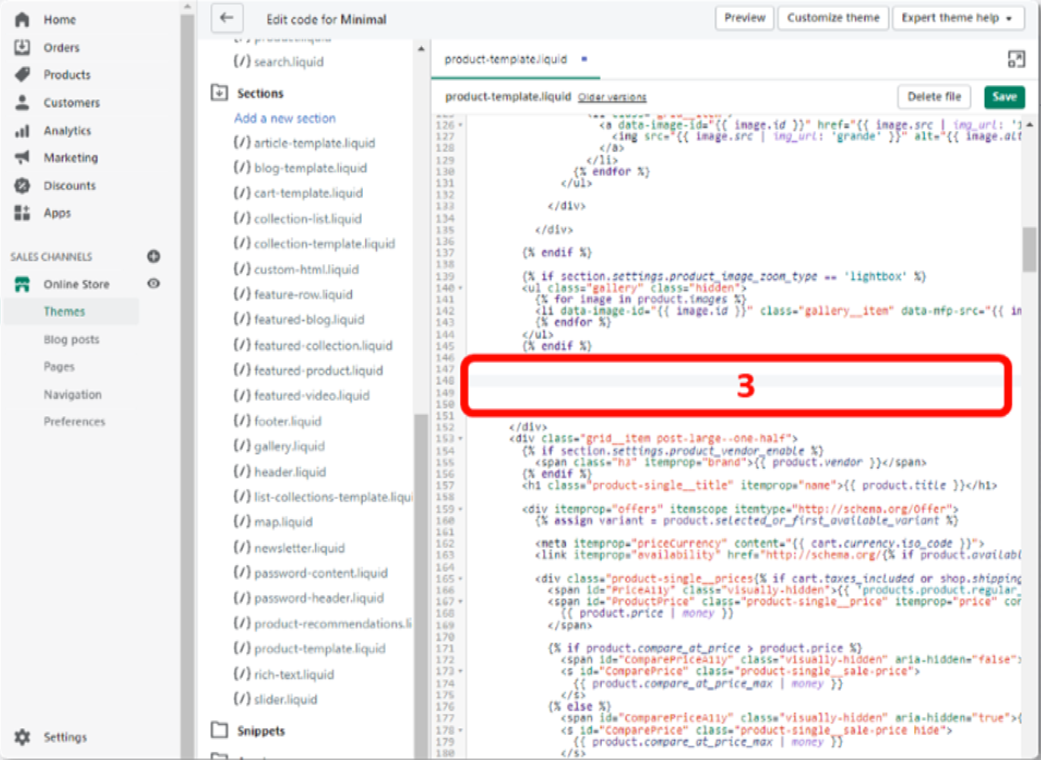
4. Paste the render code in the product-template.liquid file where you want the buttons to show up.
5. Click Save when you are done.
Note: You'll need to be familiar with code to do this.
Code to Paste:
{% render "aritize-3d-quick-ar" %}
That's it!
As you approve models on the portal, the buttons will automatically populate on your product pages.
Live Experience
Once the tag is live, two user experiences for the 'View in AR' button differ depending on if the shopper is on a mobile or desktop device:
- Mobile Web - When the shopper interacts with the View in AR button, the experience launches via WebAR on the mobile device. Here they can see the model in their space.
- Desktop Web - When the shopper interacts with the View in AR button, a QR code is shown. If scanned with a mobile device camera it will launch the mobile WebAR experience.