After you've imported your Attendees, the next step is to give (or block) Attendees access to their Attendee Profile for your show, and also allows you to choose which features they can use.
Path: Attendees> Attendee Access Manager
There are 2 main sections to the Attendee Access Manager:
Accounts Status and Global Actions
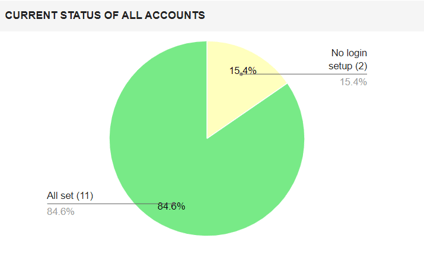
Current Status of all accounts:
Below, you'll see a pie graph displaying the current account status of all Attendees in your Attendees List. Every time you send an invite to an Attendee, the pie graph will change to show you an updated view of who's set up their account, who hasn't, and who still needs an email address added to their Attendee record.
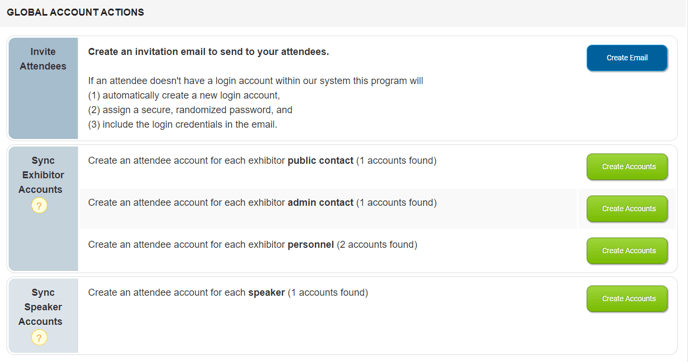
Global Account Actions
Global Account Actions enable you to perform these bulk actions, the most essential of which is creating and sending an invitation email to your Attendees:
- Invite Attendees: This step is essential to finalizing your Attendees' accounts!
Click the "Create Email" button, and you'll be taken to a prompt that lets you create an email to send to your Attendees, allows you to list each Attendee's login and password inside the email, and then allows you to choose which Attendees in your Attendees List you want to send to. - Sync Exhibitor Accounts (optional): Use this if you want to exert more control over your Exhibitor accounts by making sure an Attendee account exists for each of the Exhibitor content types. This can be done through the Access Options inside the Individual Account List & Access Level.
You can also use this if you want to quickly create Attendee accounts for the multiple contacts associated with each Exhibitor account, rather than adding them to the Attendees List first. - Sync Speaker Accounts (optional): Use this if you want to exert more control over your Exhibitor accounts by using the Access Options inside the Individual Account List & Access Level.
Attendees List & Access Options
Here, you'll see a list of your Attendees, and be able to specify what levels of access they have in your show.
You can restrict access to - and display of - certain features for Attendees individually or in bulk, or lock off Attendee access to their accounts altogether!
From left to right, these are the items and options you see on the Account List:
- Attendee: Attendee name.
- Email: Email address Attendee uses for login.
- Discussions Admin (on/off):You can give individual Attendees the ability to delete, archive, and lock Discussions.
- Discussion Host (on/off): You can give individual Attendees the ability to start and host Discussions. (If you'd like all Attendees to have this ability, you can turn that on globally in the Show Settings Panel).
- Hide Entire Profile (on/off): Hide an Attendee's entire Profile inside Event Home Base.
- Hide Contact Info (on/off): Hide an Attendee's Contact Info inside Event Home Base.
- Account Status: Shows if an Attendee account has been set up or not. Will either read "No login setup", "Missing Email", or "All set!", depending on account status.
- Locked (on/off): Locking an account still allows the Attendee to log into Event Home Base and see content, but it prevents them from editing their profile, posting in Discussions, or engaging in Chats with other Attendees or Vendors.
- Password Reset: Reset an Attendee's password and send them an email with the new password.