ARitize 3D Portal Products page is the place where you can access information of your models or give feedback on your own models to create high-quality 3D models for your customers.
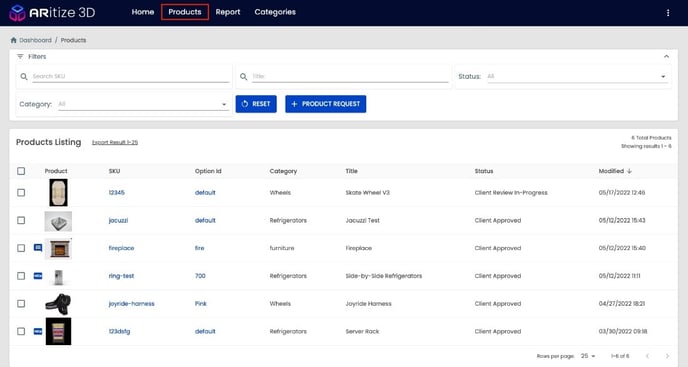
Figure 7. The image showing a user interface of the products tab.
Filters
Filters can be used to search for your product in a fraction of time.

Figure 8. The image describing different fields under filters section.
- The Filters tab can be expanded or collapsed by clicking the
 icon.
icon. - Products can be searched by SKU when clicking inside the placeholder Search SKU.
- Products can be looked up by Title when clicking inside the placeholder Title:
- Products can be filtered by Status when clicking the dropdown in the placeholder All.
- Client Review In-Progress
- The model has been made and is in the review process from client.
- This is the second most important state since it takes an extended amount of time for communication between us.
- Client Approved
- The model has been approved by client and is now ready to be placed on your website.
- This is often the most important state since it is the final state and models need to be in Client Approved state to show up on your website.
- Client Rejected
- The model has been rejected by client.
- Sent for Redo
- The model has been sent for redo.
- Needs Reupload
- The model needs reupload.
- Inactive
- The model has been inactive.
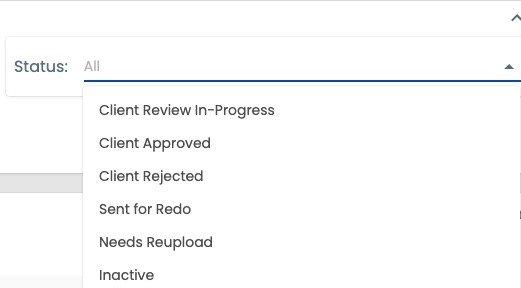
Figure 9. The image illustrating different statuses of models under filter section.
- The model has been inactive.
- Client Review In-Progress
- Products can be filtered by Category when clicking the dropdown in the placeholder All.
- Products can be searched by Configurator when clicking the dropdown in the placeholder All.
- Click RESET to remove any input in the Filters section.
- Click PRODUCT REQUEST button to create the new product request to our team.
- Title
- Input the URL of the product on your website.
- This URL represents the product URL of your product. This URL will also be used to re-direct users to when 3D & AR experiences are complete.

Figure 10. The image showing the title of the shoe 3D model contained in a red box.
- URL
- Input the SKU of the product as a unique key identifier.
- SKU will be used to pull the correct 3D models & AR experiences from our portal to your website, so it needs to be correctly matched.
- SKU
- Input the SKU of the product as a unique key identifier.
- SKU will be used to pull the correct 3D models & AR experiences from our portal to your website, so it needs to be correctly matched.
- Client Category
- Input the client category field of the product.
- This client category represents the category of your products in the ARitize portal.
- Option ID
- It is mostly set as default. However, it can be changed for the product that has variants on the same SKU e.g., same product with distinct colours.
- Dimensions
- Input the dimensions of the product consisting of height, width, and depth.
- Make sure to select the unit of measurements for your product ranging from inches to millimetres.
- Image Files
- Images are required to generate 3D assets. The more images provided from you the higher quality of 3D models is.
- You can provide a URL to image files under URLs or simply drag and drop image files under the Files section.
- Notes
- If you have any inquiry regarding the product you are adding, you can leave some notes here under Notes section.
- Title

Figure 11. The photo representing different input fields when creating a product request.
Product Listings
Product Listings display an overview of all products with major fields including Product, SKU, Option Id, Category, Title, Status, Modified.

Figure 12. The image showing multiple features of products listing section.
-
Export Result
You can click Export Result to convert all products in our portal to a PDF file for easy access. - Total Products
The Total Products field indicates a total number of your products existed in our portal. - Row per page
The Row per page dropdown can be used to change the number of products per page ranging from 10 to 500 products per page.
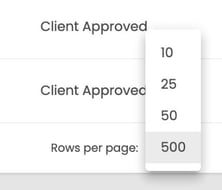
Figure 13. The picture showing a range of rows per page under the products listing section.
Product Details
The product details page for each product can be accessed by clicking the product image, the SKU, or the Option Id.

Figure 14. The image illustrating the location to click to access each product details page.
The product details page contains three main sections including Overview, Menu, and 3D Model.

Figure 15. The image describing the location of important sections in the product details page.
Overview
Overview shows information regarding the title of the product, the number of clicks, product status, or most importantly the embed model button.

Figure 16. The image showing the overview of the product including general information on the left and the way to embed model on the right.
Embed Model
Embed Model button is a straightforward way to put your model on your e-commerce platform once your model has been approved. The embedding process can be initiated by clicking the Embed Model button.
There are three ways to implement the embed model on your website including: Embed Code, Embed Buttons, and QR Code. Each way of embedding can be accessed by clicking on different sections shown in the figure below.
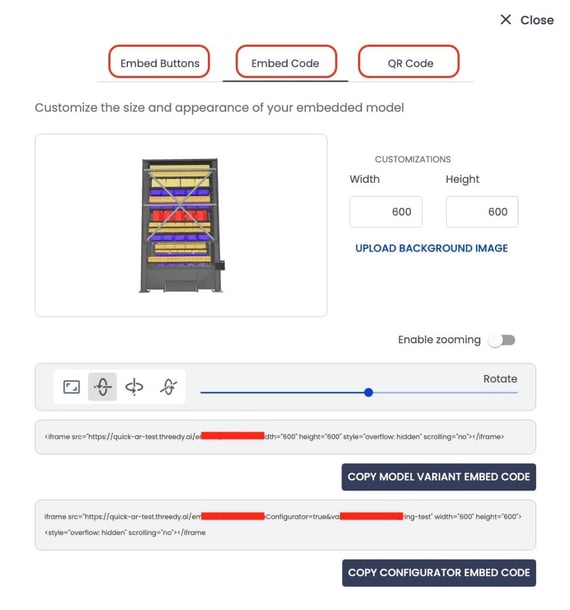
Figure 17. The image describing an interface after the Embed Model button is clicked.
Embed Buttons
Embed Buttons implementation is a trendy way to place buttons to your site or product pages, so users can access 3D interactive models and AR experiences through their phone with ease.
View in 3D and View in AR buttons are included in the basic plan. View in a room and Customize buttons are additional add-ons on top of the basic plan. You can contact our team for more information.
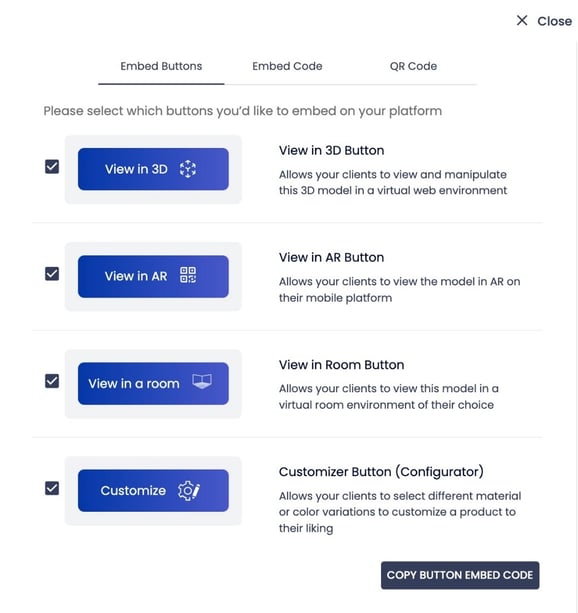
Figure 18. The image showing four types of buttons under the Embed Buttons section.
View in 3D Button
The View in 3D Button allows the user to view and interact with your 3D model in a virtual web environment.
Once the View in 3D Button has been clicked on and prior to launching the 3D model instructions on how to use the 3D Viewer will appear. When the user is ready, they can click on the Got it! button to proceed in viewing the 3D model.

Figure 19. The figure showing instructions on how to interact with the 3D Viewer through Rotate and Zoom in/Out actions.
The next screen will be the actual 3D model. The user can zoom in/out or rotate the model to see it in different angles and orientations. The user can also click on the question-mark icon ![]() to go back to the instruction page or click on the View in AR button
to go back to the instruction page or click on the View in AR button ![]() to be able to scan a QR code with a mobile phone and experience the 3D model in their environment.
to be able to scan a QR code with a mobile phone and experience the 3D model in their environment.
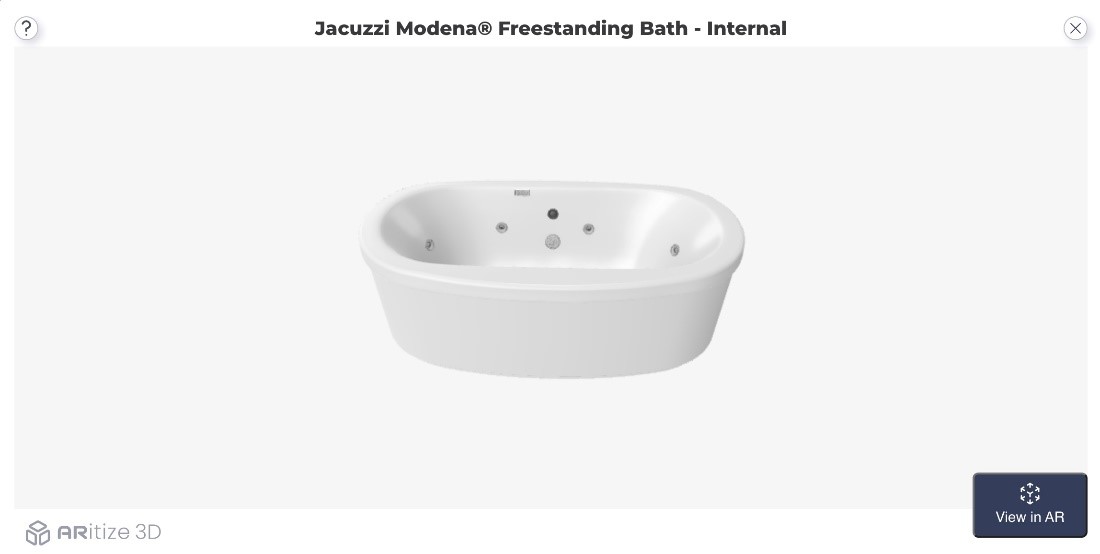
Figure 20. The image illustrating the outlook of the sample 3D model pop-up page.
View in AR Button
The View in AR Button allows the user to scan a QR code with a mobile phone and launch the AR experience in their own space.
If the View in AR Button has been clicked on a desktop device and prior to launching the AR experience, instructions on how to scan a QR code will appear. The user will be directed to scan the QR code on their mobile device using their camera app. Finally, when the user is finished with the AR experience, they can click on Got it! Button to exit the pop-up page. If the user clicks on the View in AR Button within the browser of their mobile device, they will be directly proceeded to the AR experience without the QR code pop-up screen.

Figure 21. The picture showing a sample QR code for the 3D model.
View in Room Button
View in Room Button is an add-on that allows the user to place your 3D model in a virtual environment of their choice. There are background pre-sets, or the user may upload their own image or background. This is especially helpful with interior design and room decoration since it allows users to place multiple 3D models in a virtual space.
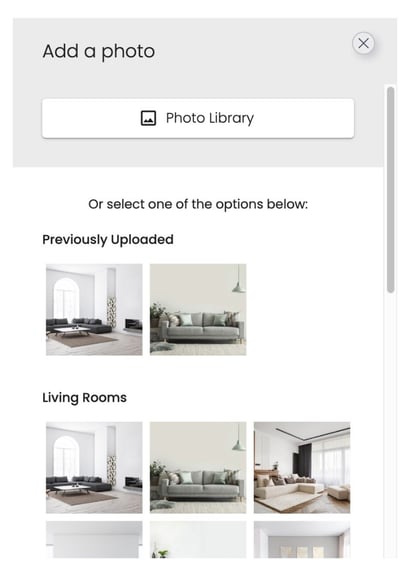
Figure 22. The image describing the user interface of the View in Room button.
Users can not only add multiple 3D models, but they can create, save and share multiple Projects. This feature will allow your clients to express their creativity by decorating their own room with your unique products.

Figure 23. The picture showing a sample 3D chair placed in a room space within the View in Room button.
Customizer Button (Configurator)
Customizer Button is an additional add-on allows your clients to vary materials or colour variations to customize your product to their taste.
Once the Customizer Button has been clicked on, the configurator of your 3D model will be popped up. You can customize your 3D model by selecting different configure parts to change colours, materials or extra features based on your preferences.

Figure 24. The image describing a configurator of a Jacuzzi bathtub.
Implementation
After you have selected which buttons you want to embed on your platform, click on COPY BUTTON EMBED CODE button and refer to the ARitize 3D’s JavaScript Tag Implementation for a quick and easy Insertion Process.

Figure 25. The picture showing the location of the embed code for the Embed Buttons section.
Embed Code
Embed Code implementation is a way to place 3D model asset directly on the website. Embedded model can be customizable in this section before making the model live.
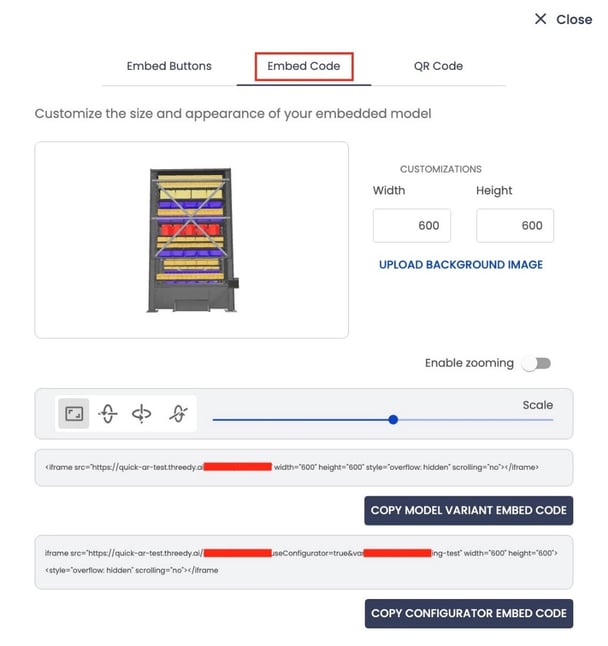
Figure 26. The figure illustrating an interface of the Embed Code section.
Customization
Size and appearance of your embedded model can be customizable here.

Figure 27. The image showing customizable features of the Embed Code section.
In this customizations section, you are free to adjust the width and height of your products. This adjustment will affect the size of your products when embedding on your website. A background image can be uploaded and used by clicking the UPLOAD BACKGROUND IMAGE button. You can also enable the zooming function for your embedded model by toggle on or off through the Enable zooming toggle switch.
There are four buttons in the image below to adjust the appearance and layout of the embedded model.

Figure 28. The figure describing four buttons used to adjust the orientation of the embedded model.
- Scale
- Select the first button.
- Click and hold the mouse cursor to slide the bold blue dot to zoom in and out.
- Rotation around x-axis
- Select the second button.
- Click and hold the mouse cursor to slide the bold blue dot to rotate inward and outward.
- Rotation around y-axis
- Select the third button.
- Click and hold the mouse cursor to slide the bold blue dot to rotate left and right.
- Rotation around z-axis
- Select the fourth button.
- Click and hold the mouse cursor to slide the bold blue dot to rotate clockwise and counterclockwise.
Implementation
When your embedded model is ready, click on COPY MODEL VARIANT EMBED CODE button and refer to the ARitize 3D’s JavaScript Tag Implementation for a quick and easy Insertion Process.

Figure 29. The image showing the location of the embed code for the Embed Code section.
QR Code
QR Code implementation is a way to place QR code of the model on the website or anywhere that you want. Users can access AR experiences by simply scanning a QR code of the model. QR Code can be customizable in this section before having it live on your website.

Figure 30. The image describing an interface of the QR code section.
Customization
The size of your QR code can be customized in this modal.
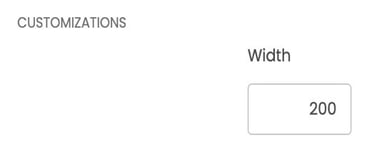
Figure 31. The image showing customizable features of the QR Code section.
In this customizations section, you are free to adjust the width your QR code. This adjustment will affect the size of your QR code on your website.
Implementation
When your QR code is ready, click on the COPY QR CODE EMBED button and refer to the ARitize 3D’s JavaScript Tag Implementation for a quick and easy Insertion Process.
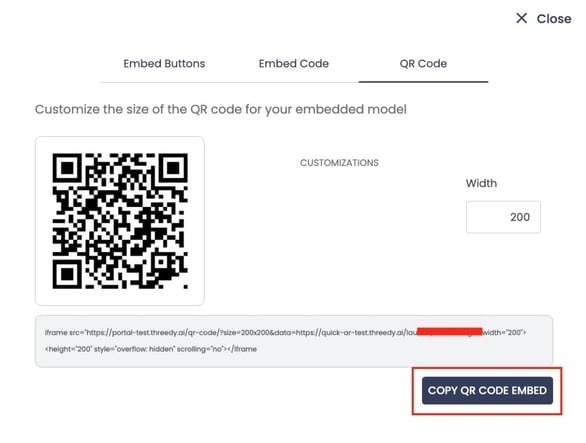
Figure 32. The image showing the location of the embed code for the QR code section.
Menu
Menu shows details of the product including reference photos, comments, model settings, and most importantly model details.

Figure 33. The image describing the details of the Menu section.
Model Details
Model Details can be accessed by clicking on the Model Details section on the left-hand side of the Menu.
Model Details include information such as Product Name, SKU, Option ID, Category, Client Key, Product Page URL, Last Modified.
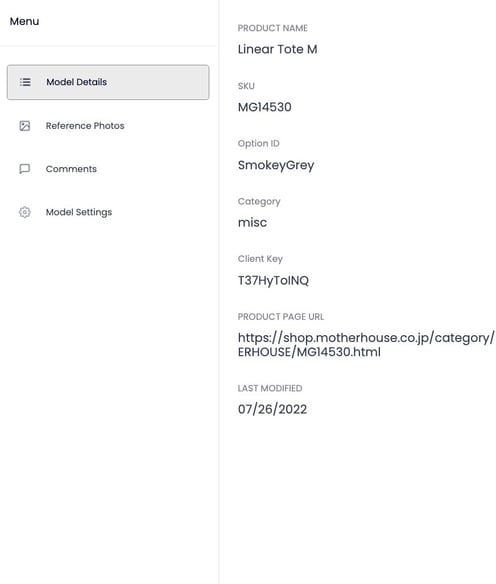
Figure 34. The image showing essential information in the Model Details subsection.
Reference Photos
Reference Photos can be accessed by clicking on the Reference Photos section on the left-hand side of the Menu.
Reference Photos include all photos of your product provided by you and it displays as a gallery.
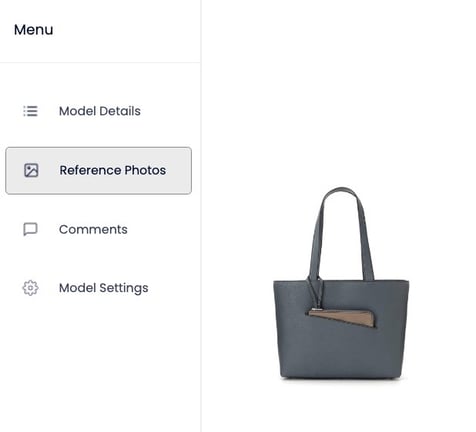
Figure 35. The figure describing the outlook of the Reference Photos subsection.
Comments
Comments can be accessed by clicking on the Comments section on the left-hand side of the Menu.
You can click Add Comment button to give feedback on what and where to adjust for your model.
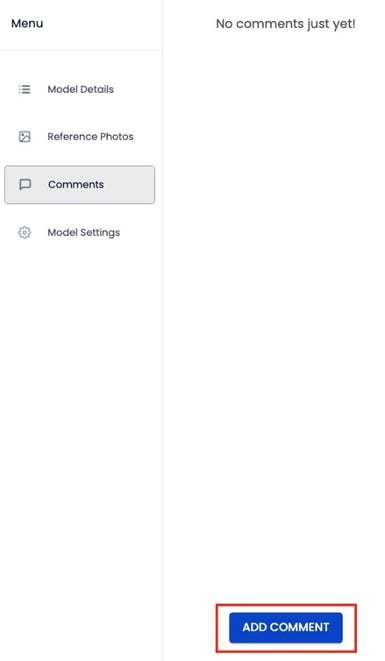
Figure 36. The picture illustrating the location of the Add Comment button in the Comments subsection.
Download Model
Download Model is an additional add-on makes available if you want to download your model throughout many popular file types including GLB, USDZ, and Object. You can contact our team for more information.

Figure 37. The photo showing different file types in the Download Model subsection.
Model Settings
Model Settings can be accessed by clicking on the Model Settings section on the left-hand side of the Menu.
The model has two states on the toggle switch: active and inactive. Active state means that your model is active, and you can now embed your model on your e-commerce platform while inactive state meaning all active embed buttons and links will be disabled and your model will stop generate clicks and will not be viewable on your e-commerce platform.

Figure 38. The figure describing the toggle switch in the Model Settings subsection.
3D Model
3D Model shows the main part that you want to see which is the 3D product. You can interact and play with your model in the centre of this section by holding click and drag or zoom in/out.

Figure 39. The image showing the outlook of the 3D Model section.
You can also toggle on or off the Comment Pins toggle switch to show or hide comments made on the 3D model on the upper right-hand corner of the 3D Model section.
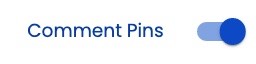
Figure 40. The picture illustrating the Comment Pins toggle switch.
Instead of zooming in or out or drag to rotate with your mouse, you can input values for X, Y, R below the 3D product to achieve the same goal. On the left-hand side of value input section, there are three buttons including a Reset button ![]() , an Expand View button
, an Expand View button ![]() , and a QR code button
, and a QR code button ![]() respectively. The Reset button is used to reset to a default orientation. The Expand View button is used to expand the model for a better view. The QR code button is used to open the QR code for you to scan and experience your 3D model in AR.
respectively. The Reset button is used to reset to a default orientation. The Expand View button is used to expand the model for a better view. The QR code button is used to open the QR code for you to scan and experience your 3D model in AR.

Figure 41. The figure describing some buttons to interact with the 3D model in-depth.